
Vocal Techniques: Visual Images for the Vocal Coach
Vocal Techniques: Visual Images for the Vocal Coach
by: MusicStaff.com Teacher Lounge Editor, Deborah Jeter
This article is the second in a series on “back to basics” teaching methods. For the first article see:
If you have a student that is having difficulties in learning to accept the challenges of making music, it could be helpful to point out some of the benefits of becoming a musician of excellence.
Music can build poise and confidence. It teaches us self-sacrifice when we give our time for long and demanding rehearsals. We learn to blend our minds and voice with other singers and instruments into that most splendid of all cooperative activities, the making of music.
We learn to appreciate things of beauty and develop aesthetic sensitivity and begin to expect of ourselves,
the highest standards attainable.
In this week’s article, special attention will be devoted to proper posture, breathing techniques and placement.
Note: These comments are merely suggestions and ideas for the vocal coach to consider. There are probably as many ways to teach as there are teachers, so keep in mind, that while these approaches and ideas may work well with one student, another student will
need another approach for certain concepts and techniques to become internalized, whereupon the student truly has ownership.
Proper Posture
Training students to align their bodies:
You’re using good standing posture when your ears, shoulders, hips, knees, and ankles are “stacked” in a straight line. (Note: Your shoulders should be relaxed and your knees slightly bent.)
Most artists are right brained learners and will internalize a lesson more quickly if they are given a visual aid or if they physically experience the task.
Example:
Here is an example of good singing posture. I am a visual learner so it was my choice to offer an image in this article in hopes that you can use it with your students.
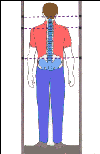
Stand with feet, shoulder width apart, arms hang loosely to the sides, the jaw is relaxed, the hips are slightly rolled forward, (with buttocks tucked “under”) and imagine a string coming straight up from the floor and running up through your body and out the top of your head which then extends upward to the ceiling.
Aligning the body in a relaxed yet definite position can be tricky at times, especially if your student has become accustomed to “sloppy” posture. As with anything new, it will take practice to correct.
A very good tip that was handed to me some years ago was a visual reminder of correcting an inappropriate habit of slumping my shoulders.
My coach explained that proper posture will create a better foundation for keeping my vocal mechanism healthier. I really wanted to change my posture but it was increasingly difficult to do especially towards the end of a long day when fatigue had set in.
She recommended that I think of an image that would be pleasant for me to look at and put that image in several places that I knew I would be everyday. One image was in my car, another image was placed on the bathroom mirror and one in my bedroom. One image was placed where I rehearsed and so on, until I had adequate visual reminders all around me.
It worked and I didn’t have to keep hearing someone remind me of my posture with that “nagging” tone of voice. I had the pleasure of seeing an image that I associated with good posture. It was a pleasing experience and one that I have used with my own students for anything from speaking correctly, to breathing
correctly, to standing with better posture.
Breathing
There can not be enough emphasis placed on the benefits of proper breathing. Not only can it reduce the stress that can accumulate in the shoulders and neck muscles, it is energizing and a key part in preventing abuse of the vocal chords.
Breathing Exercises:
1) Comfortably seated or standing, take a deep breath into the abdomen, through the nose, so that it expands out like a balloon.
2) Continue the inhale to expand the rib cage with air.
3) Next continue the inhale further to now expand the chest all the way to the upper chest, like a balloon.
Then reverse the procedure by exhaling out first from the chest, then the rib cage, then the abdomen.
Pulling in on the abdominal muscles at the end of the exhale, getting out all of the remaining air. Then reverse the process by breathing in again. Imagine that your torso is a glass and that the glass fills up from the bottom to the top and then empties from the top down to the bottom. Do this for up to 15 minutes.
Bellows Breath – great for charging up with energy or to release stress.
1) Best if seated and not driving. Spine should be straight.
2) Imagine that you are blowing a piece of dust out of your nose by sharply pulling in on the abdomen and at the same time blowing air out the nose.
3) Relax and a natural inhale will occur to fill the lungs again.
4) Again, sharply blow air out the nose by pulling in on the abdomen. Continue with the cycle so that your abdomen is functioning like a bellows, blowing air out.
5) Do this for 22 cycles and then stop and take a big breath and rest. Do three rounds of 22.
Conscious Connected Breath:
This exercise has profound healing and transformational qualities when done properly. This can safely be done on own for short times to relax and release stress.
1) Do this breathing exercise while lying down and for only 15 minutes.
2) Begin with a full inhale into the chest through the mouth.
3) Without pausing or holding, immediately allow the exhale to gush out of the mouth without pushing it or holding it back. A simple relaxed exhale.
4) Without pause begin the inhale again, pulling air up into the chest.
5) Continue with a relaxed exhale as soon as the inhale stops. This is also called the circular connected breath. Meaning that it has no pausing in it at all, but is one continuous loop.
More Breathing Exercises:
Here is an excerpt from a transcript by Stuart Leigh of a talk by Doso Roshi on “The Way of Watazumi” held in New York in 1981.
Doso Roshi was a senior zen monk before leaving to concentrate his shakuhachi study based around daily vigorous physical exercises using a Jo stick. His emphasis is on Zen and lengthening of the out breath and conscious breath.
“The way of Watazumi is to take your life force, your life strength and train it to be stronger, healthier. As you are all into playing music, there is something deeper and if you go deeper to the source of where that music is made, you will find something even more interesting. At that source, everyone’s individual music is made. That place is your own life force.”
You have to use conscious, mindful breath. Most people use unconscious breath, simple movement of the lungs. This type of breathing is like a pool of water that has been stopped up and is stagnating.
“If you breath mindfully and train your breath for
different kinds of strength, then you will develop your own kind of
music”.
It is important to regularly review your breathing or lapsing into breathing shallow will create tension in the body. The instructor should give this cause special attention when looking at why a singer may be having trouble with certain notes.
Exercise:
Taking gentle breaths… with emphasis on relaxing. Gently inhale, pause then slowly exhale, picturing the gentle stream of air. Empty the
lungs fully. Continue for 5-10 minutes. When you exhale, imagine all your stress and tension is flowing out. It is important to do these with an experienced teacher.
For more on this method, please go to this
page.
One thing worth adding, is to be sure when a deep breath is taken that the shoulders do not move, only the belly.
Placement
Placement of the vowels and consonants are important in regard to creating proper sound as well as the other areas discussed in this article. The A, is best made with a lift in the facial muscles and placed mid to forward in the mouth. The front teeth will be exposed.
Singing E, requires a more open throat but with the lift in the facial muscles and and is felt inside the middle of the mouth.I, should be preceded with the ah sound.O, slightly dropped and relaxed jaw and the roundness of the vowel should be felt and seen with the formation of the lips. U, or OO, should be felt from mid to forward in the mouth.
Consonants should be made with crisp and clear distinction in the front of the mouth. For more information on the mastering these areas, I recommend a fantastic and innovative book on singing, called, Soprano on Her Head.
Remember that when singing a word with that is sustained, that the vowel sound should carry the note.
Yawn-sigh exercise:
This is a semi-automatic activity that involves feigning a yawn.
The premeditated beginning of a yawn triggers off an elaborate set of automatic reactions. The jaw, mouth and pharynx open widely, the diaphragm descends; the thoracic dimensions increase, laterally and vertically, creating a partial vacuum; the lungs expand and air rushes through the respiratory passages to the lungs.
Since this activity is directly opposed to oral, pharyngeal and laryngeal constrictions, it becomes relatively easy to initiate a tone which is neither strident, hoarse nor nasal. Therefore many clinicians and teachers of singing and acting have their students yawn and either sigh or perform other vocalizations during the expiration phase immediately following the yawn.
The yawn actually requires tension of muscles which open the mouth, pharynx and larynx and enlarge the thoracic cavity. It is the release from the yawn that helps to establish a balance of agonistic antagonistic muscle groups. Linklater, (1976) combines this activity with movement of arms, legs and neck to help “free” the body of physical and emotional restraint.
Raggedy Ann exercise:
Have your student hang his body forward, bent at the waist and allow the arms to dangle loosely. The top of the head should be parallel to the floor. Then in this position, called the “Raggedy Ann Doll”, have your student sing a slurred, siren-like stream of notes,using the oo-ah vowel sounds. Starting in the lower register on oo and ending in his upper register on ah. Many times, the student will be amazed at how much easier the upper register notes feel and will often be able to sing even higher than they imagined.
Here are some complimentary links for furthering your research on visual images and vocal techniques:
Vocal Technique tips
Sing Wise
Become a Singing Master
Finding Your Voice”
The Complete Vocal Technique